Maybe because of the achievement tipping you off the designers are aware of this, or maybe because you got alerted to Patrice when you saw this encounter card. I certainly hope you're not here because this ruined your blind Patrice Hemlock Vale playthrough.
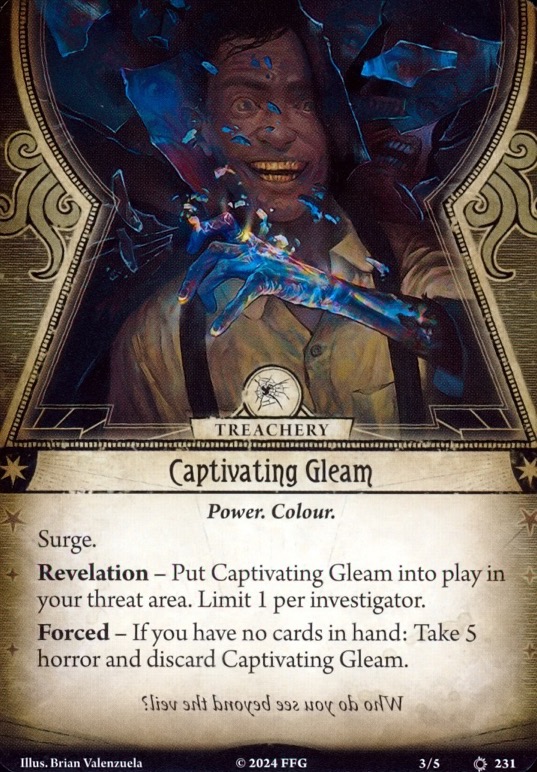
For a majority of investigators, Captivating Gleam is a mythos card that is meant to hang over you the threat of losing all your cards. After all there are many, many effects the mythos utilizes to make you discard cards in Hemlock Vale. Especially in that final scenario. Me, I think it's a well-designed treachery. They have to give you an alternative negative effect on the other cards anyways in case you are out of cards, so you can often intentionally avert Captivating Gleam- at some detriment.
But Patrice Hathaway has a problem. Her investigator ability, a little mechanically out there but pretty tame as investigators go, has a very unfavourable interaction with this treachery. Once drawn, you have exactly one investigation phase to solve Captivating Gleam, before discarding all your cards in upkeep and suffering 5 horror. To add insult, you have to go through another mythos phase right after.
We're mythos busters here though, so let's brainstorm how a non-blind playthrough investigator can challenge Captivating Gleam with Patrice.
My first thought was Patrice's usual soak go to: Idol of Xanatos. But the problem with this asset is that Captivating Gleam hits you in the precise window where you don't have cards to discard. This also goes true for cards like Perseverance and Devil's Luck, where you won't have them in hand to play; though those cards aren't great on Patrice besides. On that note, Alter Fate, a card that would work on other investigators, doesn't for Patrice as you have to draw the card on the precise investigation phase where it would be relevant.
Brute forcing horror soak is a straightforward solution then. Agnes' Boyfriend is a classic, though a bit high cost for someone you're probably getting killed taking 3 horror. Mr Pawterson could also help, though I think his more fickle advanced version would be a better choice- considering you're about to take a 5 horror one shot. If you're old fashioned like me, with a limited collection Elder Sign Amulet can make a comeback here too. Since Hemlock Vale is crawling with XP though, I'd still go with Cherished Keepsake+ and accept exiling it each time.
More proactively, you can use Patrice's mystic cardpool to defuse this horror bomb. Parallel Fates+ sticks out in particular as a good aversion method: for lower player counts Scrying and Scrying+ can avert disaster too. At the very least, if you are playing with 4 and you only have access to Scrying, just consider sneakily sitting to the left of the lead investigator. If you're playing with 2, consider just being lead investigator to maximize the turns you get off Scrying.
Back to damage cancellation assets, St. Hubert's Key sticks out as an okay blocker for this, as does Talisman of Protection. Slight bias to St. Hubert's Key though- +1 head is just nice on Patrice. Unfortunately, these two only really heal 2 horror.
Which finally brings me to the cancellation asset that can fix your problems: Nine of Rods. Pay the 6 xp, find this card, play it, and you can say no to Captivating Gleam when you draw it. I'd say this is your best bet. I don't know anyone who owns any of the "Return to" boxes though, but Nine of Rods probably deserves a proxy if you're challenging Patrice on Hemlock Vale.
My suggestion? Run 3 of Parallel Fates, Mr Pawterson, St. Hubert's Key and Nine of Rods. I know it's a lot of deckspace, but these are good assets to have for the heavy amount of horror you'll be taking outside of captivating gleam anyways. Parallel Fates and Nine of Tods ideally should be your method of avoiding the treachery itself, and your teddy bear and St. Hubert's key are there for when those fail you (usually meaning you didn't draw them ahead of time).
Can Captivating Gleam completely derail your game playing as Patrice Hathaway? In a blind playthrough, absolutely. But with a little prep, I suspect it's manageable.
She notices a gleam in the distance. Small, inconsequential, the curiosity of the strange light draws her in. To others, it's just an intriguing annoyance- but to Patrice, she can see more. She can see the colour outside of what humans can, for she can see the waves of sound, she can see glimpses of something even further.
Her mind a violin, that ebbs and flows as time passes, tethering her to reality- stuck in this captivation of this gleam, overwhelming in it's reflections as the pulsating grows and grows and grows until the tension tears the mind and... snaps! Psychic strings plucking apart, a horrifying form all too visible and filling the void in her mind to become one and more!
What can you do but scream?!